
![]() Simple. Java. Security.
Simple. Java. Security.

Apache Shiro Authorization
|
Handy Hint
|
Shiro v1 version notice
As of February 28, 2024, Shiro v1 was superseded by v2.
As of June 29, 2026, Shiro v2 was superseded by v3.
|
Table of Contents
Authorization, also known as access control, is the process of managing access to resources. In other words, controlling who has access to what in an application.
Examples of authorization checks are: Is the user allowed to look at this webpage, edit this data, view this button, or print to this printer? Those are all decisions determining what a user has access to.
Elements of Authorization
Authorization has three core elements that we reference quite a bit in Shiro: permissions, roles, and users.
Permissions
Permissions in Apache Shiro represent the most atomic element of a security policy. They are fundamentally statements about behavior and represent explicitly what can be done in an application. A well-formed permission statement essentially describes resources and what actions are possible when a Subject interacts with those resources.
Some examples of permission statements:
-
Open a file
-
View the
/user/listweb page -
Print documents
-
Delete the 'jsmith' user
Most resources will support the typical CRUD (create, read, update, delete) actions, but any action that makes sense for a particular resource type is ok. The fundamental idea is that permission statements at a minimum are based on Resources and Actions.
When looking at permissions, probably the most important thing to realize is that permission statements have no representation of who can perform the represented behavior. They are only statements of what can be done in an application.
|
Permissions represent behavior only
Permission statements reflect behavior (actions associated with resource types) |
Defining who (users) is allowed to do what (permissions) is an exercise of assigning permissions to users in some way. This is always done by the application’s data model and can vary greatly across applications.
For example, permissions can be grouped in a Role and that Role could be associated with one or more User objects. Or some applications can have a Group of users and a Group can be assigned a Role, which by transitive association would mean that all the Users in that Group are implicitly granted the permissions in the Role.
There are many variations for how permissions could be granted to users - the application determines how to model this based on the application requirements.
We’ll cover how Shiro determines if a Subject is permitted to do something or not later.
Permission Granularity
The permission examples above all specify actions (open, read, delete, etc.) on a resource type (door, file, customer, etc). In some cases, they even specify very fine-grained instance-level behavior - for example, 'delete' (action) the 'user' (resource type) with username 'jsmith' (instance identifier). In Shiro, you have the ability to define exactly how granular those statements can be.
We cover permission granularity and 'levels' of permission statements in much more detail in Shiro’s Permissions Documentation.
Roles
A Role is a named entity that typically represents a set of behaviors or responsibilities. Those behaviors translate to things you can or can’t do with a software application. Roles are typically assigned to user accounts, so by association, users can do the things attributed to various roles.
There are effectively two types of Roles, and Shiro supports both concepts:
-
Implicit Roles: Most people use roles as an implicit construct: where your application implies a set of behaviors (i.e. permissions) based on a role name only. With implicit roles, there is nothing at the software level that says
role X is allowed to perform behavior A, B and C. Behavior is implied by a name alone.
|
Potentially Brittle Security
While the simpler and most common approach, implicit roles potentially impose a lot of software maintenance and management problems. |
This is probably ok for very simple applications (e.g. maybe there is an admin role and everyone else). But for more complicated or configurable applications, this can be a major problem throughout the life of your application and drive a large maintenance cost for your software.
-
Explicit Roles: An explicit role however is essentially a named collection of actual permission statements. In this form, the application (and Shiro) knows exactly what it means to have a particular role or not. Because it is known the exact behavior that can be performed or not, there is no guessing or implying what a particular role can or can not do.
The Shiro team advocates using permissions and explicit roles instead of the older implicit approach. You will have much greater control over your application’s security experience.
|
Resource-Based Access Control
Be sure to read Les Hazlewood’s article, The New RBAC: Resource-Based Access Control [archive.org], which covers in-depth the benefits of using permissions and explicit roles (and their positive impact on source code) instead of the older implicit role approach. |
Users
A user essentially is the 'who' of an application. As we’ve covered previously however, the Subject is really Shiro’s 'User' concept.
Users (Subjects) are allowed to perform certain actions in your application through their association with roles or direct permissions. Your application’s data model defines exactly how a Subject is allowed to do something or not.
For example, in your data model, perhaps you have an actual User class, and you assign permissions directly to User instances. Or maybe you assign permissions only to Roles directly, and then assign Roles to Users, so by association, Users transitively 'have' the permissions assigned to their roles. Or you could represent these things with a 'Group' concept. It is up to you - use what makes sense for your application.
Your data model defines exactly how authorization will function. Shiro relies on a Realm implementation to translate your data model association details into a format Shiro understands. We’ll cover how Realms do this a little later.
|
Note
Ultimately, your Realm implementation is what communicates with your data source (RDBMS, LDAP, etc). So your realm is what will tell Shiro whether roles or permissions exist. You have full control over how your authorization model is structured and defined. |
Authorizing Subjects
Performing authorization in Shiro can be done in 3 ways:
-
Programmatically - You can perform authorization checks in your java code with structures like
ifandelseblocks. -
JDK annotations - You can attach an authorization annotation to your Java methods
-
JSP/GSP TagLibs - You can control JSP or GSP page output based on roles and permissions
Programmatic Authorization
Probably the easiest and most common way to perform authorization is to programmatically interact with the current Subject instance directly.
Role-Based Authorization
If you want to control access based on simpler/traditional implicit role names, you can execute role checks:
Role Checks
If you want to simply check to see if the current Subject has a role or not, you can call the variant hasRole* methods on the Subject instance.
For example, to see if a Subject has a particular (single) role, you can call the subject. hasRole(roleName) method, and react accordingly:
Subject currentUser = SecurityUtils.getSubject();

if (currentUser.hasRole("administrator")) {
    //show the admin button
} else {
    //don't show the button?  Grey it out?
}
There are few role-oriented Subject methods you can call, depending on your needs:
| Subject Method | Description |
|---|---|
Returns |
|
Returns an array of |
|
Returns |
Role Assertions
An alternative to checking a boolean to see if the Subject has a role or not, you can simply assert that they have an expected role before logic is executed. If the Subject does not have the expected role, an AuthorizationException will be thrown. If they do have the expected role, the assertion will execute quietly and logic will continue as expected.
For example:
Subject currentUser = SecurityUtils.getSubject();

//guarantee that the current user is a bank teller and
//therefore allowed to open the account:
currentUser.checkRole("bankTeller");
openBankAccount();
A benefit of this approach over the hasRole* methods is that code can be a bit cleaner in that you don’t have to construct your own AuthorizationExceptions if the current Subject does not meet expected conditions (if you don’t want to).
There are few role-oriented Subject assertion methods you can call, depending on your needs:
| Subject Method | Description |
|---|---|
Returns quietly if the |
|
Returns quietly if the |
|
Same effect as the |
Permission-Based Authorization
As stated above in our overview of Roles, often a better way of performing access control is through permission-based authorization. Permission-based authorization, because it is strongly associated with your application’s raw functionality (and the behavior on an application’s core resources), permission-based authorization source code changes when your functionality changes, not when there is a security policy change. This means code is impacted much-less frequently than similar role-based authorization code.
Permission Checks
If you want to check to see if a Subject is permitted to do something or not, you can call any of the various isPermitted* method variants. There are two primary means of checking permissions - with object-based Permission instances or with Strings that represent Permissions
Object-based Permission Checks
One possible way of performing permission checks is to instantiate an instance of Shiro’s org.apache.shiro.authz.Permission interface and pass it to the *isPermitted methods that accept permission instances.
For example, consider the following scenario: There is a Printer in an office with a unique identifier laserjet4400n. Our software needs to check to see if the current user is allowed print documents on that printer before we allow them to press a 'print' button. The permission check to see if this possible could be formulated like this:
Permission printPermission = new PrinterPermission("laserjet4400n", "print");

Subject currentUser = SecurityUtils.getSubject();

if (currentUser.isPermitted(printPermission)) {
    //show the Print button
} else {
    //don't show the button?  Grey it out?
}
In this example, we also see an example of a very powerful instance-level access control check - the ability to restrict behavior based on individual data instances.
Object-based Permissions are useful if:
-
You want compile-time type-safety
-
You want to guarantee permissions are represented and used correctly
-
You want explicit control of how permission resolution logic (called permission implication logic, based on the Permission interface’s
impliesmethod) executes. -
You want to guarantee Permissions reflect application resources accurately (for example, maybe Permission classes can be auto-generated during a project’s build based on a project’s domain model).
There are few Object permission-oriented Subject methods you can call, depending on your needs:
| Subject Method | Description |
|---|---|
Returns |
|
Returns an array of |
|
Returns |
String-based permission checks
While Object-based permissions can be useful (compile-time type-safety, guaranteed behavior, customized implication logic, etc.), they can sometimes feel a bit 'heavy-handed' for many applications. An alternative is to use normal Strings to represent a permission instance.
For example, based on the print permission example above, we can re-formulate that same check as a String-based permission check:
Subject currentUser = SecurityUtils.getSubject();

if (currentUser.isPermitted("printer:print:laserjet4400n")) {
    //show the Print button
} else {
    //don't show the button?  Grey it out?
}
This example still shows the same instance-level permission check, but important parts of the permission - printer (resource type), print (action), and laserjet4400n (instance id) - were all represented in a String.
This particular example shows a special colon-delimited format defined by Shiro’s default org.apache.shiro.authz.permission.WildcardPermission implementation, which most people will find suitable.
That is, the above code block is (mostly) a shortcut for the following:
Subject currentUser = SecurityUtils.getSubject();

Permission p = new WildcardPermission("printer:print:laserjet4400n");

if (currentUser.isPermitted(p) {
    //show the Print button
} else {
    //don't show the button?  Grey it out?
}
The WildcardPermission token format and formation options are covered in-depth in Shiro’s Permission documentation.
And while the above String defaults to the WildcardPermission format, you can actually invent your own String format and use that if you prefer. We’ll cover how to do this as part of the Realm Authorization section below.
String-based permissions are beneficial in that you are not forced to implement an interface and simple strings are often easy to read. The downside is that you don’t have type safety and if you needed more complicated behavior that are outside the scope of what the Strings represent, you’re going to want to implement your own permission objects based on the permission interface. In practice, most Shiro end-users choose the String-based approach for their simplicity, but ultimately your application’s requirements will dictate which is better.
Like the Object-based permission check methods, there are String variants to support String-based permission checks:
| Subject Method | Description |
|---|---|
Returns |
|
Returns an array of |
|
Returns |
Permission Assertions
As an alternative to checking a boolean to see if the Subject is permitted to do something or not, you can simply assert that they have an expected permission before logic is executed. If the Subject is not permitted, an AuthorizationException will be thrown. If they are permitted as expected, the assertion will execute quietly and logic will continue as expected.
For example:
Subject currentUser = SecurityUtils.getSubject();

//guarantee that the current user is permitted
//to open a bank account:
Permission p = new AccountPermission("open");
currentUser.checkPermission(p);
openBankAccount();
or, the same check, using a String permission:
Subject currentUser = SecurityUtils.getSubject();

//guarantee that the current user is permitted
//to open a bank account:
currentUser.checkPermission("account:open");
openBankAccount();
A benefit of this approach over the isPermitted* methods is that code can be a bit cleaner in that you don’t have to construct your own AuthorizationExceptions if the current Subject does not meet expected conditions (if you don’t want to).
There are few permission-oriented Subject assertion methods you can call, depending on your needs:
| Subject Method | Description |
|---|---|
Returns quietly if the |
|
Returns quietly if the |
|
Returns quietly if the |
|
Same effect as the |
Notation-based Authorization
In addition to the Subject API calls, Shiro provides a collection of Java 5+ annotations if you prefer meta-based authorization control.
Configuration
Before you can use Java annotations, you’ll need to enable AOP support in your application. There are a number of different AOP frameworks so, unfortunately, there is no standard way to enable AOP in an application.
For AspectJ, you can review our AspectJ sample application.
For Spring applications, you can look into our Spring Integration documentation.
For Guice applications, you can look into our Guice Integration documentation.
The RequiresAuthentication annotation
The RequiresAuthentication annotation requires the current Subject to have been authenticated during their current session for the annotated class/instance/method to be accessed or invoked.
For example:
@RequiresAuthentication
public void updateAccount(Account userAccount) {
    //this method will only be invoked by a
    //Subject that is guaranteed authenticated
    ...
}
This is mostly equivalent to the following Subject-based logic:
public void updateAccount(Account userAccount) {
    if (!SecurityUtils.getSubject().isAuthenticated()) {
        throw new AuthorizationException(...);
    }

    //Subject is guaranteed authenticated here
    ...
}
The RequiresGuest annotation
The RequiresGuest annotation requires the current Subject to be a "guest", that is, they are not authenticated or remembered from a previous session for the annotated class/instance/method to be accessed or invoked.
For example:
@RequiresGuest
public void signUp(User newUser) {
    //this method will only be invoked by a
    //Subject that is unknown/anonymous
    ...
}
This is mostly equivalent to the following Subject-based logic:
public void signUp(User newUser) {
    Subject currentUser = SecurityUtils.getSubject();
    PrincipalCollection principals = currentUser.getPrincipals();
    if (principals != null && !principals.isEmpty()) {
        //known identity - not a guest:
        throw new AuthorizationException(...);
    }

    //Subject is guaranteed to be a 'guest' here
    ...
}
The RequiresPermissions annotation
The RequiresPermissions annotation requires the current Subject be permitted one or more permissions in order to execute the annotated method.
For example:
@RequiresPermissions("account:create")
public void createAccount(Account account) {
    //this method will only be invoked by a Subject
    //that is permitted to create an account
    ...
}
This is mostly equivalent to the following Subject-based logic:
public void createAccount(Account account) {
    Subject currentUser = SecurityUtils.getSubject();
    if (!subject.isPermitted("account:create")) {
        throw new AuthorizationException(...);
    }

    //Subject is guaranteed to be permitted here
    ...
}
The RequiresRoles permission
The RequiresRoles annotation requires the current Subject to have all of the specified roles. If they do not have the role(s), the method will not be executed and an AuthorizationException is thrown.
For example:
@RequiresRoles("administrator")
public void deleteUser(User user) {
    //this method will only be invoked by an administrator
    ...
}
This is mostly equivalent to the following Subject-based logic:
public void deleteUser(User user) {
    Subject currentUser = SecurityUtils.getSubject();
    if (!subject.hasRole("administrator")) {
        throw new AuthorizationException(...);
    }

    //Subject is guaranteed to be an 'administrator' here
    ...
}
The RequiresUser annotation
The RequiresUser* annotation requires the current Subject to be an application user for the annotated class/instance/method to be accessed or invoked. An 'application user' is defined as a Subject that has a known identity, either known due to being authenticated during the current session or remembered from 'RememberMe' services from a previous session.
@RequiresUser
public void updateAccount(Account account) {
    //this method will only be invoked by a 'user'
    //i.e. a Subject with a known identity
    ...
}
This is mostly equivalent to the following Subject-based logic:
public void updateAccount(Account account) {
    Subject currentUser = SecurityUtils.getSubject();
    PrincipalCollection principals = currentUser.getPrincipals();
    if (principals == null || principals.isEmpty()) {
        //no identity - they're anonymous, not allowed:
        throw new AuthorizationException(...);
    }

    //Subject is guaranteed to have a known identity here
    ...
}
JSP TagLib Authorization
Shiro offers a Tag Library for controlling JSP/GSP page output based on Subject state. This is covered in the Web chapter’s JSP/GSP Tag Library section.
Authorization Sequence
Now that we’ve seen how to perform authorization based on the current Subject, let’s take a look at what happens inside Shiro whenever an authorization call is made.
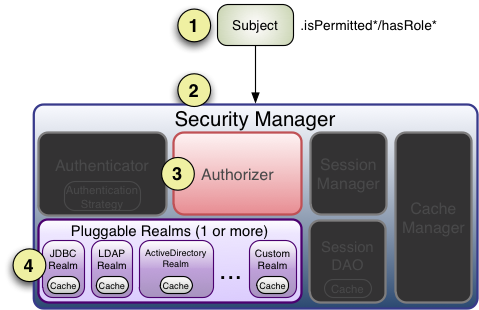
We’ve taken our previous architecture diagram from the Architecture chapter, and left only the components relevant to authorization highlighted. Each number represents a step during an authorization operation:
Step 1: Application or framework code invokes any of the Subject hasRole*, checkRole*, isPermitted*, or checkPermission* method variants, passing in whatever permission or role representation is required.
Step 2: The Subject instance, typically a DelegatingSubject (or a subclass) delegates to the application’s SecurityManager by calling the securityManager’s nearly identical respective `hasRole*, checkRole*, isPermitted*, or checkPermission* method variants (the securityManager implements the org.apache.shiro.authz.Authorizer interface, which defines all Subject-specific authorization methods).
Step 3: The SecurityManager, being a basic 'umbrella' component, relays/delegates to its internal org.apache.shiro.authz.Authorizer instance by calling the authorizer 's respective hasRole*, checkRole*, isPermitted*, or checkPermission* method. The authorizer instance is by default a ModularRealmAuthorizer instance, which supports coordinating one or more Realm instances during any authorization operation.
Step 4: Each configured Realm is checked to see if it implements the same Authorizer interface. If so, the Realm’s own respective hasRole*, checkRole*, isPermitted*, or checkPermission* method is called.
Modular Realm Authorizer
As mentioned earlier, the Shiro SecurityManager implementations default to using a ModularRealmAuthorizer instance. The ModularRealmAuthorizer equally supports applications with single Realm as well as those with multiple realms.
For any authorization operation, the ModularRealmAuthorizer will iterate over its internal collection of Realms and interact with each one in iteration order. Each Realm interaction functions as follows:
-
If the
Realmitself implements theAuthorizerinterface, its respectiveAuthorizermethod (hasRole*,checkRole*,isPermitted*, orcheckPermission*) is called.-
If the Realm’s method results in an exception, the exception is propagated as an
AuthorizationExceptionto theSubjectcaller. This short-circuits the authorization process and any remaining Realms will not be consulted for that authorization operation. -
If the Realm’s method is a
hasRole*orisPermitted*variant that returns a boolean and that return value istrue, thetruevalue is returned immediately and any remaining Realms are short-circuited. This behavior exists as a performance enhancement, as typically if permitted by one Realm, it is implied that the Subject is permitted. This favors security policies where everything is prohibited by default and things are explicitly allowed, the most secure type of security policy.
-
-
If the Realm does not implement the
Authorizerinterface, it is ignored.
Realm Authorization Order
It is important to point out that, exactly like authentication, the ModularRealmAuthorizer will interact with Realm instances in iteration order.
The ModularRealmAuthorizer has access to the Realm instances configured on the SecurityManager. When executing an authorization operation, it will iterate over that collection, and for each Realm that implements the Authorizer interface itself, invoke the Realm’s respective Authorizer method (e.g. hasRole*, checkRole*, isPermitted*, or checkPermission*).
Configuring a global PermissionResolver
When performing a String-based permission check, most of Shiro’s default Realm implementations convert this String into an actual Permission instance first before performing permission implication logic.
This is because Permissions are evaluated based on implication logic and not a direct equality check (see the Permission documentation for more about implication vs. equality). Implication logic is better represented in code than via String comparisons. Therefore, most Realms need to convert, or resolve a submitted permission string into a corresponding representative Permission instance.
To aid in this conversion, Shiro supports the notion of a PermissionResolver. Most Shiro Realm implementations use a PermissionResolver to support their implementation of the Authorizer interface’s String-based permission methods: when one of these methods is invoked on the Realm, it will use the PermissionResolver to convert the string into a Permission instance, and perform the check that way.
All Shiro Realm implementations default to an internal WildcardPermissionResolver which assumes Shiro’s WildcardPermission String format.
If you want to create your own PermissionResolver implementation, perhaps to support your own Permission string syntax, and you want all configured Realm instances to support that syntax, you can set your PermissionResolver globally for all Realms that can be configured with one.
For example, in shiro.ini:
shiro.ini
globalPermissionResolver = com.foo.bar.authz.MyPermissionResolver
...
securityManager.authorizer.permissionResolver = $globalPermissionResolver
...|
PermissionResolverAware
If you want to configure a global |
permissionResolver = com.foo.bar.authz.MyPermissionResolver

realm = com.foo.bar.realm.MyCustomRealm
realm.permissionResolver = $permissionResolver
...
Configuring a global RolePermissionResolver
Similar in concept to a PermissionResolver, a RolePermissionResolver has the ability to represent Permission instances needed by a Realm to perform permission checks.
The key difference with a RolePermissionResolver however is that the input String is a role name, and not a permission string.
A RolePermissionResolver can be used by a Realm internally when needing to translate a role name into a concrete set of Permission instances.
This is a particularly useful feature for supporting legacy or inflexible data sources that may have no notion of permissions.
For example, many LDAP directories store role names (or group names) but do not support association of role names to concrete permissions because they have no 'permission' concept. A Shiro-based application can use the role names stored in LDAP, but implement a RolePermissionResolver to convert the LDAP name into a set of explicit permissions to perform preferred explicit access control. The permission associations would be stored in another data store, probably a local database.
Because this notion of converting role names to permissions is very application specific, Shiro’s default Realm implementations do not use them.
However, if you want to create your own RolePermissionResolver and have more than one Realm implementation that you want to configure with it, you can set your RolePermissionResolver globally for all Realms that can be configured with one.
shiro.ini
globalRolePermissionResolver = com.foo.bar.authz.MyPermissionResolver
...
securityManager.authorizer.rolePermissionResolver = $globalRolePermissionResolver
...|
RolePermissionResolverAware
If you want to configure a global |
rolePermissionResolver = com.foo.bar.authz.MyRolePermissionResolver

realm = com.foo.bar.realm.MyCustomRealm
realm.rolePermissionResolver = $rolePermissionResolver
...
Custom Authorizer
If your application uses more than one realm to perform authorization and the ModularRealmAuthorizer is default simple
iteration-based, short-circuiting authorization behavior does not suit your needs, you will probably want to create a custom Authorizer and configure the SecurityManager accordingly.
For example, in shiro.ini:
[main]
...
authorizer = com.foo.bar.authz.CustomAuthorizer

securityManager.authorizer = $authorizer