![]() Simple. Java. Security.
Simple. Java. Security.

Apache Shiro Authentication
|
Handy Hint
|
Shiro v1 version notice
As of February 28, 2024, Shiro v1 was superseded by v2.
As of June 29, 2026, Shiro v2 was superseded by v3.
|
Table of Contents
Authentication is the process of identity verification - that is, proving a user actually is who they say they are.
For a user to prove their identity, they need to provide some identifying information as well as some sort of proof of that identity that your system understands and trusts.
This is done by submitting a user’s principals and credentials to Shiro to see if they match what is expected by the application.
-
Principals are a Subject’s 'identifying attributes'. Principals can be anything that identifies a Subject, such as a first name (given name), last name (surname or family name), a username, Social Security Number, etc. Of course things like family names are not very good at uniquely identifying a
Subject, so the best principals to use for authentication are unique for an application - typically a username or email address.
|
Primary Principal
While Shiro can represent any number of principals, Shiro expects an application to have exactly one 'Primary' principal - a single value that uniquely identifies the |
-
Credentials are usually secret values known only by the
Subjectwhich are used as supporting evidence that they in fact 'own' the claimed identity. Some common examples of credentials are passwords, biometric data such as fingerprints and retina scans, and X.509 certificates.
The most common example of a principal/credential pairing is that of a username and password. The username is the claimed identity, and the password is the proof matching the claimed identity. If a submitted password matches what is expected by the application, the application can largely assume that the user really is who they say they are because no-one else should know the same password.
Authenticating Subjects
The process of authenticating a Subject can effectively broken down into three distinct steps:
-
Collect the Subject’s submitted principals and credentials
-
Submit the principals and credentials for authentication.
-
If the submission is successful, allow access, otherwise retry authentication or block access.
The following code demonstrates how Shiro’s API reflects these steps:
Step 1: Collect the Subject’s principals and credentials
//Example using most common scenario of username/password pair:
UsernamePasswordToken token = new UsernamePasswordToken(username, password);

//"Remember Me" built-in:
token.setRememberMe(true);
In this particular case, we’re using the UsernamePasswordToken, supporting the most common username/password authentication approach. This is an implementation of Shiro’s org.apache.shiro.authc.AuthenticationToken interface, which is the base interface used by Shiro’s authentication system to represent submitted principals and credentials.
It is important to note here that Shiro does not care how you acquire this information: perhaps the data was acquired by a user submitting an HTML form, or maybe it was retrieved from an HTTP header, or perhaps it was read from a Swing or Flex GUI password form, or maybe via command line arguments.
The process of collecting information from an application end-user is completely decoupled from Shiro’s AuthenticationToken concept.
You may construct and represent AuthenticationToken instances however you like - it is protocol agnostic.
This example also shows that we have indicated that we wish Shiro to perform 'Remember Me' services for the authentication attempt. This ensures that Shiro remembers the user identity if they return to the application at a later date. We will cover Remember Me services in a later chapter.
Step 2: Submit the principals and credentials
After the principals and credentials have been collected and represented as an AuthenticationToken instance, we need to submit the token to Shiro to perform the actual authentication attempt:
Subject currentUser = SecurityUtils.getSubject();

currentUser.login(token);
After acquiring the currently-executing Subject, we make a single login call, passing in the AuthenticationToken instance we created earlier.
An invocation to the login method effectively represents an authentication attempt.
Step 3: Handling Success or Failure
If the login method returns quietly, that’s it - we’re done!
The Subject has been authenticated.
The application thread can continue uninterrupted and all further calls to SecurityUtils.getSubject() will return the authenticated Subject instance, and any calls to subject.isAuthenticated() will return true.
But what happens if the login attempt failed? For example, what if the end-user supplied an incorrect password, or accessed the system too many times and maybe their account is locked?
Shiro has a rich runtime AuthenticationException hierarchy that can indicate exactly why the attempt failed.
You can wrap login in a try/catch block and catch any exception you wish and react to them accordingly.
For example:
try {
    currentUser.login(token);
} catch ( UnknownAccountException uae ) { ...
} catch ( IncorrectCredentialsException ice ) { ...
} catch ( LockedAccountException lae ) { ...
} catch ( ExcessiveAttemptsException eae ) { ...
} ... catch your own ...
} catch ( AuthenticationException ae ) {
    //unexpected error?
}

//No problems, continue on as expected...
If one of the existing exception classes do not meet your needs, custom AuthenticationExceptions can be created to represent specific failure scenarios.
|
Login Failure Tip
While your code can react to specific exceptions and execute logic as necessary, a security best practice is to only show a generic failure message to an end user in the event of a failure, for example, "Incorrect username or password.". This ensures no specific information is available to hackers that may be attempting an attack vector. |
Remembered vs. Authenticated
As shown in the example above, Shiro supports the notion of "remember me" in addition to the normal login process. It is worth pointing out at this time that Shiro makes a very precise distinction between a remembered Subject and an actual authenticated Subject:
-
Remembered: A remembered
Subjectis not anonymous and has a known identity (i.e.subject.getPrincipals()is non-empty). But this identity is remembered from a previous authentication during a previous session. A subject is considered remembered ifsubject.isRemembered()returnstrue. -
Authenticated: An authenticated
Subjectis one that has been successfully authenticated (i.e. theloginmethod was invoked without throwing an exception) during the Subject’s current session. A subject is considered authenticated ifsubject.isAuthenticated()returnstrue.
|
Mutually Exclusive
Remembered and authenticated states are mutually exclusive - a |
Why the distinction?
The word 'authentication' has a very strong connotation of proof.
That is, there is an expected guarantee that the Subject has proven they are who they say they are.
When a user is only remembered from a previous interaction with the application, the state of proof no longer exists: the remembered identity gives the system an idea who that user probably is, but in reality, has no way of absolutely guaranteeing if the remembered Subject represents the expected user. Once the subject is authenticated, they are no longer considered only remembered because their identity would have been verified during the current session.
So although many parts of the application can still perform user-specific logic based on the remembered principals, such as customized views, it should typically never perform highly-sensitive operations until the user has legitimately verified their identity by executing a successful authentication attempt.
For example, a check to see if a Subject can access financial information should almost always depend on isAuthenticated(), not isRemembered(), to guarantee an expected and verified identity.
An illustrating example
The following is a fairly common scenario that helps illustrate why the distinction between remembered and authenticated is important.
Let’s say you’re using Amazon.com. You’ve logged-in successfully and have added a few books to your shopping cart. But you have to run off to a meeting, but forget to log out. By the time the meeting is over, it’s time to go home, and you leave the office.
The next day when you come in to work, you realize you didn’t complete your purchase, so you go back to amazon.com.
This time, Amazon 'remembers' who you are, greets you by name, and still gives you some personalized book recommendations.
To Amazon, subject.isRemembered() would return true.
But, what happens if you try to access your account to update your credit card information to make your book purchase?
While Amazon 'remembers' you (isRemembered() == true), it cannot guarantee that you are in fact you (for example, maybe a co-worker is using your computer).
So before you can perform a sensitive action like updating credit card information, Amazon will force you to login, so they can guarantee your identity.
After you log in, your identity has been verified and to Amazon, isAuthenticated() would now be true.
This scenario happens so frequently for many types of applications, so the functionality is built in to Shiro, so you can leverage it for your own application.
Now, whether you use isRemembered() or isAuthenticated() to customize your views and workflows is up to you, but Shiro will maintain this fundamental state in case you need it.
Logging Out
The opposite of authenticating is releasing all known identifying state.
When the Subject is done interacting with the application, you can call subject.logout() to relinquish all identifying information:
currentUser.logout(); //removes all identifying information and invalidates their session too.When you call logout, any existing Session will be invalidated and any identity will be disassociated (e.g. in a web app, the RememberMe cookie will also be deleted).
After a Subject logs-out, the Subject instance is considered anonymous again and, except for web applications, can be re-used for login again if desired.
|
Web Application Notice
Because remembered identity in web applications is often persisted with cookies, and cookies can only be deleted before a Response body is committed, it is highly recommended to redirect the end-user to a new view or page immediately after calling |
Authentication Sequence
Until now, we’ve only looked at how to authenticate a Subject from within application code.
Now we’ll cover what happens inside Shiro when an authentication attempt occurs.
We’ve taken our previous architecture diagram from the Architecture chapter, and left only the components relevant to authentication highlighted. Each number represents a step during an authentication attempt:
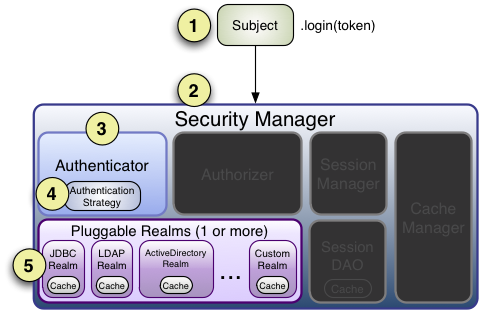
Step 1: Application code invokes the Subject.login method, passing in the constructed AuthenticationToken instance representing the end-user’s principals and credentials.
Step 2: The Subject instance, typically a DelegatingSubject (or a subclass) delegates to the application’s SecurityManager by calling securityManager.login(token), where the actual authentication work begins.
Step 3: The SecurityManager, being a basic 'umbrella' component, receives the token and simply delegates to its internal Authenticator instance by calling authenticator.authenticate(token).
This is almost always a ModularRealmAuthenticator instance, which supports coordinating one or more Realm instances during authentication.
The ModularRealmAuthenticator essentially provides a PAM-style paradigm for Apache Shiro (where each Realm
is a 'module' in PAM terminology).
Step 4: If more than one Realm is configured for the application, the ModularRealmAuthenticator instance will initiate a multi-Realm authentication attempt utilizing its configured AuthenticationStrategy.
Before, during and after the Realms are invoked for authentication, the AuthenticationStrategy will be called to allow it to react to each Realm’s results.
We will cover AuthenticationStrategies soon.
|
Single-Realm Application
If only a single Realm is configured, it is called directly - there is no need for an |
Step 5: Each configured Realm is consulted to see if it supports the submitted AuthenticationToken.
If so, the supporting Realm’s getAuthenticationInfo method will be invoked with the submitted token.
The getAuthenticationInfo method effectively represents a single authentication attempt for that particular Realm.
We will cover the Realm authentication behavior shortly.
Authenticator
As mentioned earlier, the Shiro SecurityManager implementations default to using a ModularRealmAuthenticator instance.
The ModularRealmAuthenticator equally supports applications with single Realm as well as those with multiple realms.
In a single-realm application, the ModularRealmAuthenticator will invoke the single Realm directly.
If two or more Realms are configured, it will use an AuthenticationStrategy instance to coordinate how the attempt occurs.
We’ll cover AuthenticationStrategies below.
If you wish to configure the SecurityManager with a custom Authenticator implementation, you can do so in shiro.ini for example:
[main]
...
authenticator = com.foo.bar.CustomAuthenticator

securityManager.authenticator = $authenticator
Although in practice, the ModularRealmAuthenticator is probably suitable for most needs.
AuthenticationStrategy
When two or more realms are configured for an application, the ModularRealmAuthenticator relies on an internal AuthenticationStrategy component to determine the conditions for which an authentication attempt succeeds or fails.
For example, if only one Realm authenticates an AuthenticationToken successfully, but all others fail, is the authentication attempt considered successful?
Or must all Realms authenticate successfully for the overall attempt to be considered successful?
Or, if a Realm authenticates successfully, is it necessary to consult other Realms further?
An AuthenticationStrategy makes the appropriate decision based on an application’s needs.
An AuthenticationStrategy is a stateless component that is consulted 4 times during an authentication attempt (any necessary state required for these 4 interactions will be given as method arguments):
-
before any of the Realms are invoked
-
immediately before an individual Realm’s
getAuthenticationInfomethod is called -
immediately after an individual Realm’s
getAuthenticationInfomethod is called -
after all the Realms have been invoked
Also, an AuthenticationStrategy is responsible for aggregating the results from each successful Realm and 'bundling' them into a single AuthenticationInfo representation.
This final aggregate AuthenticationInfo instance is what is returned by the Authenticator instance and is what Shiro uses to represent the `Subject’s final identity (aka Principals).
|
Subject Identity 'View'
If you use more than one Realm in your application to acquire account data from multiple data sources, the |
Shiro has 3 concrete AuthenticationStrategy implementations:
AuthenticationStrategy class |
Description |
|---|---|
If one (or more) Realms authenticate successfully, the overall attempt is considered successful. If none authenticate successfully, the attempt fails. |
|
Only the information returned from the first successfully authenticated Realm will be used. All further Realms will be ignored. If none authenticate successfully, the attempt fails. |
|
All configured Realms must authenticate successfully for the overall attempt to be considered successful. If any one does not authenticate successfully, the attempt fails. |
The ModularRealmAuthenticator defaults to the AtLeastOneSuccessfulStrategy implementation, as this is the most commonly desired strategy.
However, you could configure a different strategy if you wanted:
[main]
...
authcStrategy = org.apache.shiro.authc.pam.FirstSuccessfulStrategy

securityManager.authenticator.authenticationStrategy = $authcStrategy

...
Since Shiro 3.0.0, AtLeastOneSuccessfulStrategy will warn if authentication attempt fails due to a system error (e.g. a database connection failure) instead of an actual authentication failure (e.g. incorrect password). This is because in a multi-realm environment, it can be difficult to determine if an authentication failure was due to an actual authentication failure or a system error. In addition to the warning, an AuthenticationExceptionEvent will be published to the EventBus with the exception details, which can be used for logging or monitoring purposes. The warning can be disabled by setting the warnIfAuthenticatorFailed property to false.
Here is an example of shiro.ini which works only when
AtLeastOneSuccessfulStrategy is used[main]
...
securityManager.authenticator.authenticationStrategy.warnIfAuthenticatorFailed = false|
Custom AuthenticationStrategy
If you wanted to create your own |
Realm Authentication Order
It is very important to point out that the ModularRealmAuthenticator will interact with Realm instances in iteration order.
The ModularRealmAuthenticator has access to the Realm instances configured on the SecurityManager.
When performing an authentication attempt, it will iterate over that collection, and for each Realm that supports the submitted AuthenticationToken, invoke the Realm’s getAuthenticationInfo method.
Implicit Ordering
When using Shiro’s INI configuration format, you should configure Realms in the order you want them to process an AuthenticationToken`. For example, in `shiro.ini, Realms will be consulted in the order in which they are defined in the INI file.
That is, for the following shiro.ini example:
blahRealm = com.company.blah.Realm
...
fooRealm = com.company.foo.Realm
...
barRealm = com.company.another.Realm
The SecurityManager will be configured with those three realms, and during an authentication attempt, blahRealm, fooRealm, and barRealm will be invoked in that order.
This has basically the same effect as if the following line were defined:
securityManager.realms = $blahRealm, $fooRealm, $barRealmUsing this approach, you don’t need to set the securityManager's realms property - every realm defined will automatically be added to the realms property.
Explicit Ordering
If you want to explicitly define the order in which the realms will be interacted with, regardless of how they are defined, you can set the securityManager’s realms property as an explicit collection property.
For example, if using the definition above, but you wanted the blahRealm to be consulted last instead of first:
blahRealm = com.company.blah.Realm
...
fooRealm = com.company.foo.Realm
...
barRealm = com.company.another.Realm

securityManager.realms = $fooRealm, $barRealm, $blahRealm
...|
Explicit Realm Inclusion
When you explicitly configure the |
Realm Authentication
This chapter covers Shiro’s main workflow explaining how an authentication attempt occurs. The internal workflow of what happens in a single realm as it is consulted during authentication (i.e. 'Step 5' above) is covered in the Realm chapter’s Realm Authentication section.